Ads

Ads

Translate

Showing posts with label Android. Show all posts

Sunday, 8 March 2015

Sourcecode HR Manager Example


Before Download u must join fb group first
Download dilinkini

Tuesday, 6 May 2014

Delphi XE6 App tethering and barcodes


Fun with Delphi XE6 App tethering and barcodes


One of the new key features in XE6 is what Embarcadero has chosen to call App Tethering components - the only problem I initially had with the name was that it implied that mobile had to be involved in some way - which is not the case. You can make a windows service that is a "receiver" from a desktop application running on the same sub-net.

An example could be POS systems, running on various devices talking to the same receiver - without bothering about implementing multiple communications protocols - these components all wraps this up nicely.

I wanted to give these new component a try, by making a very simple barcode scanner using my phone as the barcode scanner and then have the receiver send the barcode to whatever application was active.

A word of warning: this is a prof of concept - not ready for production or deployment - you need to do some work yourself to make it fit your needs. I have tried to use as little code as possible - leaving out all exception handling :-).


Part 1 - The "receiver" desktop app.


Start with a new Desktop application either VCL or FireMonkey will do, add a TTetheringManager, a TTetheringAppProfile, a TLabel and a TCheckBox - which all should end up looking a bit like this:


Change the (Manager)Text property on the TTetheringManager to 'BarcodeReceiverManager', on the TTetheringAppProfile change the (Profile)Text property to 'BarcodeReceiver' and set the Manager property to point to the TTetheringManager.

Since we want to send the received barcode to the active application, we just use a send key function - in this case I have just used the WinAPI keybd_event() method - it would be more correct to use SendInput() - but the barcodes consists of non-unicode characters. For the letters we also need to send along the shift key.

  procedure SendKeys(const S: String);
  var
    I: Integer;
  begin
    for I := 1 to Length(S) do
    begin
      if CharInSet(S[I], ['A'..'Z']) then
        keybd_event(VK_SHIFT, 0, 0, 0);
      keybd_event(Ord(S[I]), MapVirtualKey(Ord(S[I]), 0),0, 0);
      keybd_event(Ord(S[I]), MapVirtualKey(Ord(S[I]), 0), KEYEVENTF_KEYUP, 0);
      if CharInSet(S[I], ['A'..'Z']) then
        keybd_event(VK_SHIFT, 0, KEYEVENTF_KEYUP, 0);
    end;
  end;

On the TTetheringAppProfile.OnResourceReceived event add the following code to send the string received from the mobile app - and maybe a carriage return - if our TCheckBox is checked.

 SendKeys(AResource.Value.AsString);
 if cbAddReturn.IsChecked then
   SendKeys(char(13));


Part 2 - The "sender" mobile app.

Create a new FireMonkey Mobile Application, add a TTetheringManager, a TTetheringAppProfile, a TEdit, a TLabel and two TSpeedButtons - which all should end up looking a bit like this:

This design will never get accepted on any App Store :-D

On the TTetheringAppProfile set the Manager property to point to the TTetheringManager.

Now on the FormShow event we want to unpair any Managers already paired with this TTetheringManager, and after that trigger the Discover event.

 for I := TetheringManager1.PairedManagers.Count - 1 downto 0 do
   TetheringManager1.UnPairManager(TetheringManager1.PairedManagers[I]);
 TetheringManager1.DiscoverManagers;

At the end of the discovery, the TTetheringManager.OnEndManagersDiscovery event is called:

 for I := 0 to RemoteManagers.Count-1 do
   if (RemoteManagers[I].ManagerText = 'BarcodeReceiverManager')  then
   begin
     TetheringManager1.PairManager(RemoteManagers[I]);
     Break; // Break since we only want the first...
   end;

 followed by the TTetheringManager.OnEndProfilesDiscovery event:

 Label1.Text := 'No receiver found';
 for i := 0 to TetheringManager1.RemoteProfiles.Count-1 do
   if (TetheringManager1.RemoteProfiles[i].ProfileText = 'BarcodeReceiver') then
   begin
     if TetheringAppProfile1.Connect(TetheringManager1.RemoteProfiles[i]) then
       Label1.Text := 'Receiver ready.'
   end;

Notice the only two references to the "Text" properties we set in our "receiver" applications Manager and Profile components - the rest is done by magic (or a lot of Indy code I didn't need to write :-D)

And the last thing we need to add is on the OnClick event of the "Send barcode" button:

 TetheringAppProfile1.SendString(TetheringManager1.RemoteProfiles[0], 
                                 'Barcode from mobile', Edit1.Text);

Now we can start our "receiver" application, and run our "sender" mobile app on iOS or Android, and in theory it should work.

I did put the tethering example to a minimum, for a more correct examples see the samples include with XE6 - it seems that there is a lot of extra stuff hidden in these 2 components - maybe for another post.

Part 3 - Barcode scanning.

There are some examples out there for doing this both on Android and iOS - I guess you could also invest in some commercial components like those from TMS or WinSoft.

I previously been using the ZBar library on iOS/ObjectiveC and xzing library Android/Java - because ZBar wasn't that good on Android years back.

For this example I am only going to do Android using xzing as what is called an intent. I guess that using intents on Android is best practice, but I guess most Delphi developers are not that keen on being depending on any framework or other thing we do not control - like Windows :-D

When doing Android Apps in Java, I did not always follow the intent way, but included the xzing core.jar file - that would also be possible in Delphi - but getting the classes wrapped into Delphi interfaces would take some work, or someone should sponsor me by buying either WinSoft JavaImportor CHUA Chee Wee's Android2DelphiImport - even better if Embarcadero bundles one of them in XE6 update 1 :-)

Update: Software Union also provides Java2Pas which might do the trick.

I did have a peek at the code from Thomas K's TKRBarcodeScanner component (beware terrible link :-) ) which for iOS is depending on the TMS component.

Since we are going to use the clipboard to get the barcode from the xzing intent, and still behave as good citizens preserving what is already there - we declare some variables:

 FPreservedClipboardValue: TValue;
 FMonitorClipboard: Boolean;
 ClipService: IFMXClipboardService;

Notice the TValue from the System.Rtti unit - it is kind of a Variant and then not.
On the FormCreate event we start testing if the platform supports what we think of as a clipboard, and we also wants it to support application events - so that we can check when the intent is done and our app becomes active again.

 var
   aFMXApplicationEventService: IFMXApplicationEventService;
 begin
   FMonitorClipboard := False;
   if not TPlatformServices.Current.SupportsPlatformService(IFMXClipboardService,  IInterface(ClipService)) then
     ClipService := nil;
   if TPlatformServices.Current.SupportsPlatformService(IFMXApplicationEventService,  IInterface(aFMXApplicationEventService)) then
   begin
     aFMXApplicationEventService.SetApplicationEventHandler(HandleAppEvent);
   end
   else
   begin
     Log.d('Application Event Service is not supported.');
   end;
 end;

Now we want to call the xzing intent to scan a barcode, put the result on the clipboard and return when done. So on the OnClick event of the "Scan barcode" we put the following code:

 if Assigned(ClipService) then
 begin
   FPreservedClipboardValue := ClipService.GetClipboard;
   FMonitorClipboard := True;
   ClipService.SetClipboard('nil');
   intent := TJIntent.Create;
   intent.setAction(StringToJString('com.google.zxing.client.android.SCAN'));
 //    intent.putExtras(TJIntent.JavaClass.EXTRA_TEXT, StringToJString('"SCAN_MODE", "CODE_39"'));
   SharedActivity.startActivityForResult(intent, 0);
 end;

We create an instance of TJIntent, set its action to the zxing barcode scanner intent, which you might need to install on your mobile before running this app, if you do not already have the intent via some other app. You need to convert the name of the intent to a Java string. You can among other things also specify which barcode types that can be read - doing that increases the speed and precision of the scanning - so if you know you only need Code 39 or EAN13 you should specify that.

When the application event fires, we check if it was because our app became active and we were monitoring the clipboard.

 Result := False;
 if FMonitorClipboard and (AAppEvent = TApplicationEvent.BecameActive) then
 begin
   Result := GetBarcodeValue;
 end;

The GetBarcodeValue function gets the barcode from the clipboard, and restores the old value from before we initiated the scan:

 Result := False;
 FMonitorClipboard := False;
 if (ClipService.GetClipboard.ToString <> 'nil') then
 begin
   Edit1.Text := ClipService.GetClipboard.ToString;
   ClipService.SetClipboard(FPreservedClipboardValue);
   Result := True;
 end;

Done - you should now have a working app - which could need a lot of extra error checking and care. But like baking your own bread I hope this has been fun. I have added some extra links below to people or code that might also be helpful - including the full code for download. If you just have interest in the barcode part there are better examples in the links below - also be aware that in XE6 the StringToJString has move to the Androidapi.Helpers unit.

Links:

The source code: Receiver application and Scanner app.
Jim McKeeth is always helpfull: http://delphi.org/2014/02/scanning-barcodes-with-rad-studio-xe5/
FMX Express is very active collecting relevnat stuff: http://www.fmxexpress.com/qr-code-scanner-source-code-for-delphi-xe5-firemonkey-on-android-and-ios/ - there is also a better link to Thomas K. code there.
John Whitham should also be mentioned: http://john.whitham.me.uk/xe5/

Monday, 16 December 2013

Combo 3 Aplikasi untuk memperpanjang umur Batre dan Ram pada Android

sesekali ngepos tentang android ga apa2 kan teman2 :D hehe ...
sekalian mau berbagi, daripada nyimpen ilmu, mending dibagikan
semoga bisa jadi amal yang bermanfaat :)

pada pertemuan kali ini di post yang sedang kalian baca, saya akan memberikan bocoran aplikasi apa saja yang memperpanjang umur batre android dan ram.

mari simak, dimulai dari aplikasi bermana Greenify

1. Greenify

Greenify adalah nama aplikasi yang telah cukup lama tersedia di Google Play Store.Aplikasi ini berfungsi untuk hibernate aplikasi yang berjalan di background.Dengan demikian bisa meningkatkan battery life.
Tak perlu khawatir mengenai stabilitas sistem karena Greenify tidak memiliki efek buruk bagi kerja sistem Android. -Kata http://teknologi.inilah.com 
 Di sini keunggulan "Greenify", aplikasi ini hanya akan meng-hibernasi (arti Indonesia-nya: Membuat tidur) aplikasi, masih terpasang dan masih bisa digunakan ketika kita memerlukannya. Greenify akan menghentikan "wakelock" aplikasi tersebut, sehingga tidak akan berjalan di background. -kata  http://erwincahyadi.blogspot.com/


Cara penggunaannya, masukkan daftar2 list2 aplikasi ke dalam list hibernasi, otomatis greenify akan bekerja saat layar hp mati (standby).

Kesimpulan dari saya :
Greenify adalah aplikasi yang sangat baik untuk perangkat android yang dapat mengoptimalkan penggunaan memori, meningkatkan kinerja RAM,serta  meningkatkan kecepatan dan meningkatkan masa pakai baterai Android. Aplikasi ini gratis sehingga tidak ada alasan ragu-ragu untuk men-download dan menginstal aplikasi ini. Greenify app adalah salah satu aplikasi terbaik dan paling banyak didownload dengan rating rata-rata 4,5 di Google Store. Anda dapat men-download aplikasi ini dari toko Google Play. Rooted perlu untuk dapat menginstal dan menggunakan aplikasi ini.

2. DS Battery Saver


Deep Sleep Battery Saver Pro adalah aplikasi yang berfungsi untuk menghemat pemakaian baterai android. Para pengguna android mungkin kebanyakan merasa bahwa baterainya sangat boros. Hal ini sangat wajar mengingat bahwa android adalah smartphone yang canggih sehingga meskipun tidak sedang digunakan, beberapa aplikasi ada yang tetap berjalan jika kita tidak melaakukan optimasi atau rooting. Aada solusi untuk mengatasi hal ini, salah satunya yaitu dengan menggunakan aplikasi untuk mengatur beberapa aplikasi agar tidak berjalan disaat android sedang tidak kita gunakan. -Kata : http://riozanix.blogspot.com
Deep Sleep Battery Saver menjadikan android anda dalam posisi deepsleep saat layar mati.Ketika dalam posisi deepsleep, Wifi, 3G akan di putus, background apps juga di matikan. Dimana aplikasi ini tidak akan bekerja seperti Facebook, Google Service. dll. sehingga baterai lebih hemat.Namun, mode deepsleep dalam perioda beberapa menit sekali akan menjadi posisi normal untuk melakukan pengecekan seperti email dan facebook status. Dan setelah itu posisi deepsleep kembali. -Kata : http://xversailez.blogspot.com

Contoh setting Deep Sleep Battery Saver dibawah ini
  • Setting Gentle mengkontrol koneksi WIFI / Data, mengatur waktu screen off dan wake up setiap 30 menit
  • Setting Strong memperlambat koneksi setiap 45 menit dan hanya wake up 1 menit
  • Setting Slumberer yang paling agresif mematikan smartphone secara total bila layar off. -menurut pejelasan : http://obengplus.com
 Saya menggunakan settingan yang slumberer untuk device android saya
Vandroid T2CI :)

3. Memory Booster Lite
Karena banyak artikel tentang memory booster dan aplikasinya hampir sama ini saya kasih screenshootnya saja, agar tidak salah download nantinya


Conclusion dari ketiga review singkat diatas : Ketiganya mempunyai WhiteList yang dapat dipilih2 agar aplikasi yang akan di standbykan dapat difilter. Penggunaan memory ketiganya tergolong kecil.

Taraaaa.... itu Ketiga aplikasi yang sudah saya install di Device Android saya ...
Alhamdulillah saya sangat sangat Puas .... Batre Andro saya tahan lama :) semoga saja umurnya juga tahan lama, karena menurut survey ... alat alat elektronik itu ada masa hidupnya, misalkan lampu, masa hidupnya berapa ribu jam, Power Bank berapa ratus kali Charging, Begitu juga batre andro :)

Oke. Sekian Artikel ringan dari saya, semoga tulisan ini dapat diambil manfaatnya, Sekian Terimakasih.
untuk Link Download Menyusul ya :)

Friday, 1 November 2013

A tool fixing the "adb server is out of date" bug


If you are debugging your Android app on a phone or a tablet over USB, you might get the following message shown every time you (or your debugging tool) runs ADB:
adb server is out of date. killing...
* daemon started successfully *
Or even worse:
adb server is out of date. killing...
* daemon started successfully *
** daemon still not runningerror: cannot connect to daemon
The message will make every small operation involving ADB last 3-5 seconds, making deployment annoyingly slow and failing most of the times.
This happens because your phone sync application (e.g. HTC Sync) has its own version of adb.exe that is incompatible with Android SDK. Every time you connect your phone to a USB port, the sync application will try to start its own version of adb.exe interfering with your one.

The solution

A trivial solution would be to find the old adb.exe (e.g. C:\Program Files (x86)\HTC\HTC Sync 3.0\adb.exe) and delete it. However, this would break the sync application functionality.
To make things better we have developed ADBFix - a small tool that you can download from this page. The tool will detect the older instances of adb.exe that are conflicting with Android SDK and replace them with a stub. The stub will always run the adb.exe from Android SDK instead, so no conflicts will arise.
To fix the "adb server is out of date" bug, please follow these steps:
  1. Connect your device to the USB port
  2. Download and run ADBFix.
  3. Specify the location of your Android SDK.
  4. Ensure that ADBFix finds the conflicting version of adb.exe:
  5. Press "Fix all". Ensure that the conflict is marked as "fixed":
  6. Note that you can always roll back the fix by selecting an ADB instance and pressing "Restore original ADB".

The internals

When you start the tool, it will search for all instances of adb.exe running (and potentially causing future "adb server out of date" messages) and compare their versions with the version of adb.exe from Android SDK. If a version mismatch is found, the tool will rename the old adb.exe to adb_conflicting_backup.exe and put a shortcut to the adb.exe from SDK in place of the old adb.exe.
Thus, both Android SDK and your sync application (e.g. HTC Sync) will use the same version of adb.exe causing no more conflicts.
Note that when you click "Fix All" you will see the "adb server is out of date" message, as adbfix will have to stop the old adb.exe. Once it's successfully stopped, the the new version will be used and the annoying message won't bother you again.

Download

You can download ADBFix here:adbfix.zip

Monday, 26 November 2012

Memperhalus Tampilan Android dengan Bravia Engine

CARA INI SUDAH DITERAPKAN DI Vandroid T2Ci dan Andromax U berjalan mulus .... 

Memasang teknologi Bravia Engine pada ponsel Android mungkin sebagian di antara kita ada yang bertanya "apa itu teknologi Bravia Engine dan apa fungsinya?"

jawabannya : teknologi Bravia Engine adalah teknologi besutan Sony yang pada awalnya hanya di terapkan pada Televisi-Televisi keluaran Sony dan baru-baru ini teknologi tersebut dapat di nikmati pada beberapa ponsel cerdas android keluaran Sony (terutama seri Xperia) dan fungsi teknologi ini adalah memberikan tampilan gambar dan video yang sangat jernih dan tajam pada ponsel cerdas android kita.

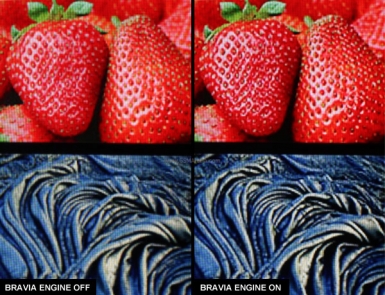
Berikut adalah perbedaan pengambilan gambar engine biasa vs Bravia Engine


1. HP yang sudah di-root, akan hilang garansinya.
2. Do This With Your Own Risk.


Bahan:
1. Root Explorer (download disini)
2. Bravia Engine (download disini)


Proses:a. Install terlebih dahulu Root Exploreryang telah didownload di HP Android agan-agan sekalian.
b. Install Winrar di windows.
c. Kemudian, ekstrak file Bravia Engine.Klik kanan file, kemudian “Extract Here”.
Seharusnya sekarang sudah ada 2 file yang terdiri dari : be_movie, be_photo.
d. Copy kedua data tersebut kedalam SD Card.

e. Mari kita mulai mengoprek-oprek system. Buka aplikasi Root Explorer, kemudian copy kedua file tersebut ke “/system/etc”.

f. Pada tombol diatas ubah Mounted as “r.w” menjadi Mounted as “r.o”

g. Kemudian ubah permission satu-persatu file dengan menekan dan tahan pada nama file.

h. Maka akan muncul pilihan (Options) pilih Permissions, kemudian ubah settingan nya seperti gambar dibawah ini.

i. Lalukan hal yang sama untuk setiap file (be_movie, dan be_photo).
j. Kembali ke dalam folder “/System”. Cari file “build.prop” tekan dan tahan lama, maka akan muncul menu Options, pilih “Open in Text Editor”.

k. Scroll kehalaman paling bawah, kemudian  cari tempat yang kosong, ketikkan script ini:
SCRIPT:
ro.service.swiqi.supported=true
persist.service.swiqi.enable=1


(**Note= Jangan menggunakan huruf Besar pada saat mengetikkan script ini.)
(**Note= Script terdiri dari 2 baris, jangan digabung menjadi 1 baris!!!!)

l. Jika telah selesai, tekan tombol “Menu” dan pilih “Save & Exit”.
Jika sudah simpan dan tutup editor teks tersebut,lalu Reboot (matikan ponsel dan nyalakan kembali) ponsel android anda,maka ponsel anda sudah terpasang teknologi bravia engine

dan berikut ini perbandingan sesudah dan sebelum menggunakan bravia engine

bravia engine

selamat mencoba

Sunday, 25 November 2012

Mempercepat Kinerja dan Internet Android

Silahkan download aplikasi untuk mempercepat kinerja dan koneksi internet Android anda

1 . Rakun Optimizer

Download

Rasakan perbedaan setelah anda optimalisasi dengan Rakun Optimizer
silahkan comment ya kalau android agan agan jadi kenceng ....

2. Ram Manager PRO

DOwnload


3. SD BOOSTER

Download

Silahkan dishare ya .... 3 file apk di atas khusus untuk mempercepat kinerja android , dan juga bisa untuk mempercepat koneksi internet android karena system nya ter Tweak maka pengambilan data juga akan mengikuti system ....

Jika berhasil ,,, silahkan comment dan share .....
^_^ salam android

Best Post This Year

Install Fortesreport community Delphi 7 dan RX Berlin

Download  Pertama2 kita harus punya file installernya terlebih dahulu, download  https://github.com/fortesinformatica/fortesrepo...

Total Pageviews

© 2014 Fajar Priyadi. WP themonic converted by Bloggertheme9. Published By Gooyaabi Templates | Powered By Blogger
TOP